
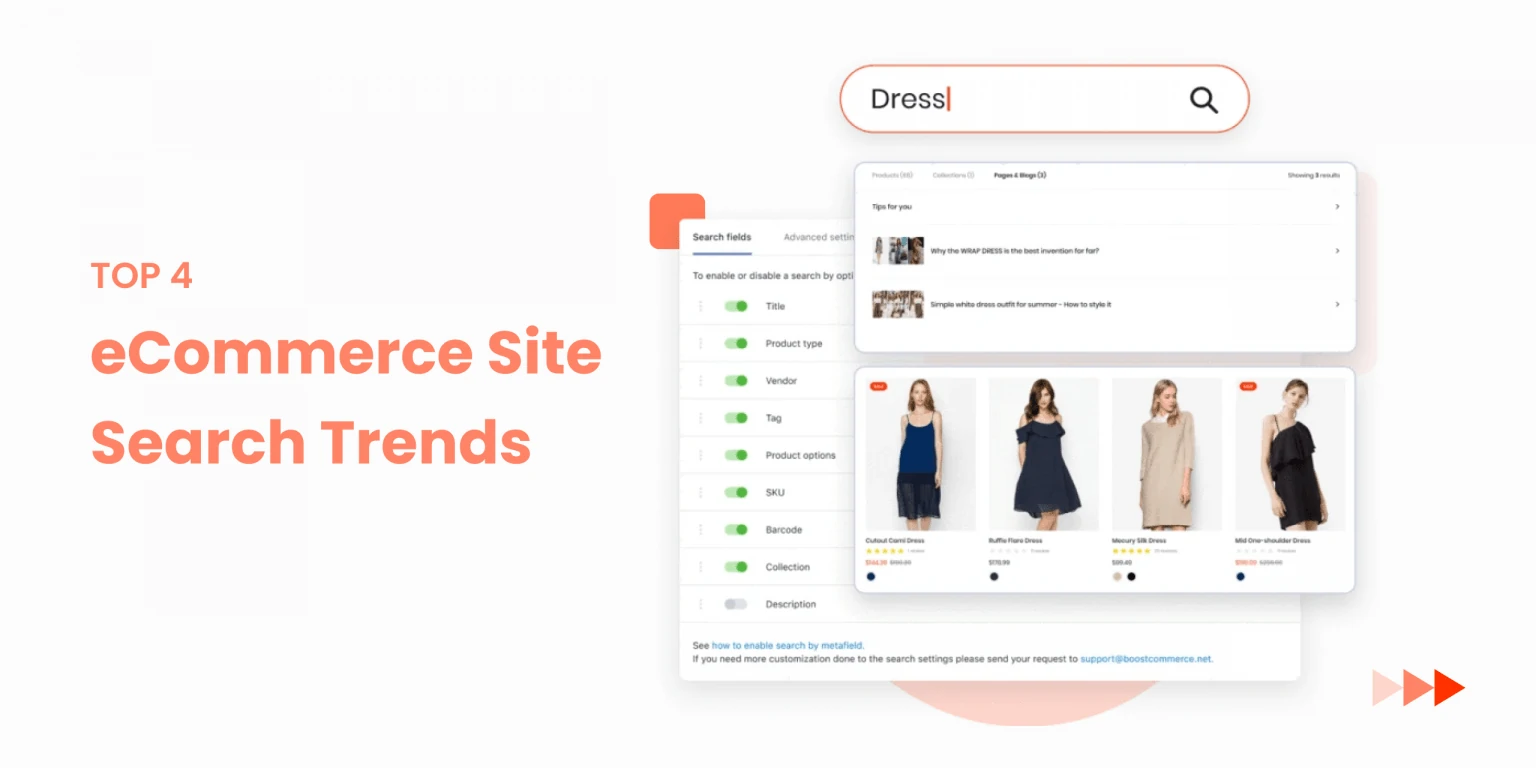
Online Stores’ Top 4 eCommerce Site Search Trends 2021
1 March, 2021
Grab 5 Tricks can help Bounce Rate for eCommerce website
3 March, 2021
When you’re a contractor or a small business owner, payments are your livelihood. Customers are notoriously stingy when it comes to making timely payments, as you have probably discovered firsthand. In fact, late payments are more common than on-time payments, according to Business Wire, with 62 percent of all small business payments arriving late in 2019 and 57 percent in 2020.
It’s critical to learn how to collect money from obstinate clients without alienating, insulting, or damaging your reputation in order to survive and prosper. Remember that the majority of your clients will be late by default, and you can’t afford to sever all ties with them.
Based on our comprehensive experience, the Smartify Apps team offers some specific advice:
Consider yourself in their situation#
You must stay calm and objective when a payment is past due. The fastest way to alienate clients is to be provoked and make demands over the phone or via email. Take a deep breath and analyze the matter from their point of view instead. It’s possible they’re busy, have forgotten, are currently facing financial difficulties, or are dealing with a personal issue. Give them some breathing room if you want to create and maintain a long-term relationship.
Communicate with tact and decency#
Then, preferably over the phone, follow up with a kind reminder. Practice what you’re going to say ahead of time. Maintain a kind and understanding tone while remaining firm. Describe the situation: a payment was due on a specific date, and the deadline is nearing or has passed. Don’t make personal attacks on them or ask as to why they didn’t pay. If you choose to compose an email, prepare it at night and review it in the morning to ensure you aren’t being confrontational before sending it.
Let your expectations clear#
Regardless of the channel you use, always explain your expectations. “I’d certainly enjoy it if you paid by…” is a good example, as is “We are expecting a payment from you…, according to our agreement.” Inquire about their health and well-being, and let them know you’re accessible to answer any questions they might have. Place the ball in their court and allow them time to react.
Communicate with a large number of people#
Unless you’re dealing with a single person, you should always try to speak with several people. If you’re dealing with a company, for example, you should collaborate with other people. It’s more likely that informing one or more of them about the overdue payment will be noted. It also puts pressure on the person in charge of making the payment, as their reputation may be harmed as a result of the delay.
Make a method for setting up early reminders#
Every month, the majority of us make at least a dozen minor or big payments. It’s easy to lose sight of when and where things are due. That’s why many service providers send out the payment due date reminders in advance, usually a week ahead of time and on the due date. Adopting this method is a great idea because it is non-aggressive, professional, and resource-light.
Offer to create a customized or flexible billing schedule#
Some clients find it difficult to make large, one-time payments and prefer to make a series of smaller payments instead. Others want to make payments on their own time rather than on a monthly plan. If your clients are reliable and have paid you on time, you should offer to build up a tailored or flexible payment arrangement to meet their demands.
Make your invoicing process more efficient by automating it#
Zenbusiness outlines the advantages of using software to automate your billing process. First and foremost, it relieves you of your weight. You don’t have to deal with the nitty-gritty of payment collecting, such as giving clients payment links. Second, to avoid being late, you can set up automatic invoicing. Finally, you can provide them with a variety of payment alternatives. If a client can play with just a few clicks using their preferred method of payment, for example, you’ll almost certainly be paid on time.
Pause work#
What if the client still doesn’t pay you after a couple of pleasant reminders? Consider putting their project on hold. They will be inconvenienced or lose time and money if the work is vital enough. Delays are enough to wake anyone up and make them sit up and pay attention.
Customers should be rewarded#
Customers who pay early or for numerous months in advance may be rewarded, depending on the nature of your firm. Many cell phone carriers, for example, offer a free extra month of service to consumers who pay in advance. You may reward early birds with a discount on your goods or service, earning brownie points in the process. CSM has a number of innovative incentive schemes.
Use the carrot-and-stick strategy#
Sometimes using a rewards-and-consequences strategy pays off. You can build up consequences for late payments if you can motivate clients to pay early. Clients are more inclined to pay on time if they know they’ll be charged a late fee and how much interest they’ll be charged if they wait. When you send out your regular reminders, make sure to specify the late fee.
Conclusion#
People, not perfect clients, exist. When interacting with them, keep your expectations in check. Pay attention to your payment policies. While remaining polite and considerate, set strong boundaries. Humble requests always get a better response than angry warnings or promises of catastrophic repercussions. Being persistent and following up can help you be professional while still keeping the pressure on.
Of course, you will occasionally come across difficult clients that refuse to pay no matter what. If this occurs, look into your legal options, such as small claims court or debt collection agencies. Learning the ins and outs of money collection, as well as how successful organizations manage their clientele, is well worth your time. Having a robust procedure in place will lead to a long-term sustainable and reliable business.
Image via Unsplash
Lorem ipsum dolor sit amet enim. Etiam ullamcorper. Suspendisse a pellentesque dui, non felis. Maecenas malesuada elit lectus felis, malesuada ultricies. Curabitur et ligula.